git clone https://github.com/financeCoding/dart_datastore_example.git
cd dart_datastore_example
pub install
If you are not connected to a Compute Engine instance, make sure to run
the following commands (in a bash-like shell):
12345678910
# convert the .p12 private key file to a .pem file# if asked to enter import password, use "notasecret"openssl pkcs12 -in <privatekey>.p12 -nocerts -passin pass:notasecret -nodes -out <rsa_private_key>.pem
# configure your credentialsexport DATASTORE_SERVICE_ACCOUNT=<service-account>
export DATASTORE_PRIVATE_KEY_FILE=<path-to-pem-file>
export CLOUD_PROJECT_ID=<project-id>
export CLOUD_PROJECT_NUMBER=<project-number>
Alternatively the sample allows for passing parameters via commandline:
12345
cd dart_datastore_example
pub install
cd bin
# dart dart_datastore_example.dart <project-id> <project-number> <path-to-pem-file> <service-account>dart dart_datastore_example.dart dartcloud 657648630269 privatekey.pem 657648630269-ge2he8e46y4u42bd89nmgtj52j3ilzvv@developer.gserviceaccount.com
Example output on first run:
123456
dartcloud
657648630269
privatekey.pem
657648630269-ge2he8e46y4u42bd89nmgtj52j3ilzvv@developer.gserviceaccount.com
did not found entity
> entity={question: {"stringValue":"Meaning of life?"}, answer: {"integerValue":42}}
Example output on second run:
123456
dartcloud
657648630269
privatekey.pem
657648630269-ge2he8e46y4u42bd89nmgtj52j3ilzvv@developer.gserviceaccount.com
found entity={"key":{"partitionId":{"datasetId":"s~dartcloud"},"path":[{"kind":"Trivia","name":"hgtg"}]},"properties":{"question":{"stringValue":"Meaning of life?"},"answer":{"integerValue":42}}}> entity={question: {"stringValue":"Meaning of life?"}, answer: {"integerValue":42}}
The comments in the sample’s source explain its behavior in detail:
import"dart:io";import"package:google_oauth2_client/google_oauth2_console.dart";import"package:google_datastore_v1beta2_api/datastore_v1beta2_api_client.dart"asclient;import"package:google_datastore_v1beta2_api/datastore_v1beta2_api_console.dart"asconsole;voidmain(List<String>args){Map<String,String>envVars=Platform.environment;StringprojectId=envVars['CLOUD_PROJECT_ID']==null?args[0]:envVars['CLOUD_PROJECT_ID'];StringprojectNumber=envVars['CLOUD_PROJECT_NUMBER']==null?args[1]:envVars['CLOUD_PROJECT_NUMBER'];StringpemFilename=envVars['DATASTORE_PRIVATE_KEY_FILE']==null?args[2]:envVars['DATASTORE_PRIVATE_KEY_FILE'];StringserviceAccountEmail=envVars['DATASTORE_SERVICE_ACCOUNT']==null?args[3]:envVars['DATASTORE_SERVICE_ACCOUNT'];print(projectId);print(projectNumber);print(pemFilename);print(serviceAccountEmail);Stringiss=serviceAccountEmail;Stringscopes='https://www.googleapis.com/auth/userinfo.email ''https://www.googleapis.com/auth/datastore';Stringrsa_private_key_file=newFile(pemFilename).readAsStringSync();ComputeOAuth2ConsolecomputeEngineClient=newComputeOAuth2Console(projectNumber,privateKey:rsa_private_key_file,iss:iss,scopes:scopes);console.Datastoredatastore=newconsole.Datastore(computeEngineClient)..makeAuthRequests=true;// Create a RPC request to begin a new transactionvarbeginTransactionRequest=newclient.BeginTransactionRequest.fromJson({});Stringtransaction;client.Keykey;client.Entityentity;// Execute the RPC asynchronouslydatastore.datasets.beginTransaction(beginTransactionRequest,projectId).then((client.BeginTransactionResponsebeginTransactionResponse){// Get the transaction handle from the response.transaction=beginTransactionResponse.transaction;// Create a RPC request to get entities by key.varlookupRequest=newclient.LookupRequest.fromJson({});// Create a new entities by keykey=newclient.Key.fromJson({});// Set the entity key with only one `path_element`: no parent.varpath=newclient.KeyPathElement.fromJson({'kind':'Trivia','name':'hgtg'});key.path=newList<client.KeyPathElement>();key.path.add(path);lookupRequest.keys=newList<client.Key>();// Add one key to the lookup request.lookupRequest.keys.add(key);// Set the transaction, so we get a consistent snapshot of the// entity at the time the transaction started.lookupRequest.readOptions=newclient.ReadOptions.fromJson({'transaction':transaction});// Execute the RPC and get the response.returndatastore.datasets.lookup(lookupRequest,projectId);}).then((client.LookupResponselookupResponse){// Create a RPC request to commit the transaction.varreq=newclient.CommitRequest.fromJson({});// Set the transaction to commit.req.transaction=transaction;if(lookupResponse.found.isNotEmpty){// Get the entity from the response if foundentity=lookupResponse.found.first.entity;print("found entity = ${entity.toString()}");}else{print("did not found entity");// If no entity was found, insert a new one in the commit request mutation.entity=newclient.Entity.fromJson({});req.mutation=newclient.Mutation.fromJson({});req.mutation.insert=newList<client.Entity>();req.mutation.insert.add(entity);// Copy the entity key.entity.key=newclient.Key.fromJson(key.toJson());// Add two entity properties:// - a utf-8 string: `question`client.Propertyproperty=newclient.Property.fromJson({});property.stringValue="Meaning of life?";entity.properties=newMap<String,client.Property>();entity.properties['question']=property;// - a 64bit integer: `answer`property=newclient.Property.fromJson({});property.integerValue=42;entity.properties['answer']=property;// Execute the Commit RPC synchronously and ignore the response:// Apply the insert mutation if the entity was not found and close// the transaction.returndatastore.datasets.commit(req,projectId);}}).then((client.CommitResponsecommitResponse)=>print("> entity = ${entity.properties}"));}
Example deployment and startup scripts for GCE with Dart
setup-instance.sh script creates the node with the right correct scopes and image.
12345678910111213141516171819202122232425
#!/usr/bin/env bashset+oxtraceUSER=$USERPROJECT=dart-compute-projectINSTANCE_NAME=dart-computeTAGS=dartMACHINE_TYPE=f1-microNETWORK=defaultIP=ephemeralIMAGE=https://www.googleapis.com/compute/v1/projects/debian-cloud/global/images/backports-debian-7-wheezy-v20140318SCOPES=https://www.googleapis.com/auth/userinfo.email,https://www.googleapis.com/auth/compute,https://www.googleapis.com/auth/devstorage.full_control,https://www.googleapis.com/auth/datastorePERSISTENT_BOOT_DISK=trueAUTO_DELETE_BOOT_DISK=trueZONE=us-central1-bSTARTUP_SCRIPT=startup-script.shGCUTIL="gcutil --service_version=v1 --project=$PROJECT"$GCUTILaddinstance$INSTANCE_NAME--tags=$TAGS--zone=$ZONE--machine_type=$MACHINE_TYPE--network=$NETWORK--external_ip_address=$IP--service_account_scopes=$SCOPES--image=$IMAGE--persistent_boot_disk=$PERSISTENT_BOOT_DISK--auto_delete_boot_disk=$AUTO_DELETE_BOOT_DISK--metadata_from_file=startup-script:$STARTUP_SCRIPTrc=$?if[[$rc!=0]];thenecho"Not able to add instance"exit$rcfi
startup-script.sh script that provisions the node with dart.
12345678910111213141516171819202122
#!/usr/bin/env bash#Addanaddtionalsourceforthelatestglibcsudosed-i'1i deb http://ftp.us.debian.org/debian/ jessie main'/etc/apt/sources.list#Updatesourcessudoapt-getupdate#DownloadlatestglibcsudoDEBIAN_FRONTEND=noninteractiveapt-get-tjessieinstall-ylibc6libc6-devlibc6-dbggitscreenunzipvim#Downloadthelatestdartsdkwgethttp://storage.googleapis.com/dart-archive/channels/dev/release/latest/sdk/dartsdk-linux-x64-release.zip -O dartsdk-linux-x64-release.zip #Unpackthedartsdkunzip-d/dartsdk-linux-x64-release.zip#Makethesdkreadablechmod-Rgo+rx/dart-sdk#Adddartbintoglobalpathecho"export PATH=\$PATH:/dart-sdk/bin">>/etc/profile
The dart-gde has updated the chrome.dart to ‘0.4.0’. This release contains a whole rewrite of the project. All APIs are now generated from chrome apps/ext IDLs. Most unit tests from previous chrome.dart have been ported.
About chrome.dart
chrome.dart package provides the generated APIs to access chrome apps & extensions through dart interfaces. The APIs depend on the js-interop to communicate with the javascript vm for accessing the APIs. Currently no native interfaces exist between dart vm and chrome browser. In a later point in time those interfaces will exist, for now this provides a way to access those interfaces.
chrome_gen.dart -> chrome.dart
At first chrome_gen.dart was the project that kicked off moving to generated APIs. It was getting frustrating having to hand write, maintain and test chrome.dart. We did avoid looking into generation from IDL, because the IDL in the chromium is in two different formats json & chrome specific WebIDL. The nice part about the original chrome.dart package is we could introduce more structure for the APIs then what the generated javascript APIs looked like. So after initial development by Devon Carew, we decided it was a better direction to use parsers and generators to create and maintain the APIs. Four months later we had a 90% complete package that was already being used by a few projects, including spark. We are able to generate enough structure to keep nice APIs and generate form the IDL, this was a win for the project.
Documentation
The API documentation is automatically generated for Apps and Extensions on each check in. A few wiki pages exist and we are in the process of migrating them from chrome_gen.dart wiki -> chrome.dart wiki. We do need help and welcome pull requests and wiki edits.
Samples
Currently the best source of project setup exists with app in the project. The app folder in a dart project will not have the automatic symlinks generated by pub. That helps out greatly since it would pollute our folder structure and cause bad things to happen. Instead we have a simple setup_app.dart script that helps build and copy packages over to the app folder. Right now its specific for the chrome.dart project but should be easy to replicate for your own chrome apps or extensions. Another neat script which is mac specific but could be generalized is load_app.sh. load_app.sh shows a simple way to load up an application in app folder from command line.
Helping out
We still need more unit tests, documentation, and additional development. If your interested checkout the github issues or send pull requests.
I was looking into using dart on Beaglebone Black and decided it would be useful to share with others what I found.
After a some build hacks and patches I found a minimal working solution for Beaglebone Black with DebianARMhf. A few important notes before going down the road of building dart for ARM. The dart-sdk is not fully supported and pub currently might not work. The dartanalyzer might not work. The only supported ARM architectures are the ones that have ARMv7 with VFP. Don’t spin your wheels trying to target any architecutre that is not ARMv7 with VFP (minimum at the moment ARMv7-A) unless you plan on implementing the routines needed in the runtime arm assembler. If you do plan on implementing them, well thats just pure awesome!
assembler_arm.cc
1234567891011121314151617181920
voidCPUFeatures::InitOnce(){#if defined(USING_SIMULATOR)integer_division_supported_=true;neon_supported_=true;#elseASSERT(CPUInfoContainsString("ARMv7"));// Implements ARMv7.ASSERT(CPUInfoContainsString("vfp"));// Has floating point unit.// Has integer division.if(CPUInfoContainsString("QCT APQ8064")){// Special case for Qualcomm Krait CPUs in Nexus 4 and 7.integer_division_supported_=true;}else{integer_division_supported_=CPUInfoContainsString("idiva");}neon_supported_=CPUInfoContainsString("neon");#endif // defined(USING_SIMULATOR)#if defined(DEBUG)initialized_=true;#endif}
I work mostly on mac so Ubuntu installed on VirtualBox was needed to help with cross compiling and flashing of uSD cards.
Update the packages
Just to be safe update any Ubuntu packages before installing the development software.
Install basic packages
I typically use the git overlay on subversion when working with the dart repo. The java jre/jdk is required for building the dart_analyzer which does not work in the sdk.
A git patch can be found here 7725354, that patches the build scripts to support building the dart-sdk for ARM. Patching the VERSION file was done in an attempt to get pub working. At the moment its not required. If not done then an old version number is baked into the dartvm. This patch also modifies which dartvm creates the snapshots for pub, dart2js and a wrapper util. Patch creates the requirement of having to build the dartvm for x64 before building the dart-sdk for ARM. The dart build scripts have a funky dependency of wanting to use the dartvm target to create the snapshot files. Which in this case wont work since our dartvm is an ARM target being built on x64.
Building of the dart-sdk for ARM target is a two stop process. First build x64 so we can use that dartvm to generate the snapshot files. Then the second step is running the create_sdk build for ARM. When the build is finished the out/ReleaseARM/dart-sdk should contain a full dart-sdk build. Keep in mind this does build the dartanalyzer but it may not work on ARM.
shell
12345
# build a target for your native system to create the snapshot files. ./tools/build.py -m debug -v -a x64 -j 8
# build the arm target./tools/build.py -m release -v -a arm -j 8 create_sdk
Tarball the sdk
Package up the dart-sdk as a tarball to distribute.
shell
12
cd ./out/ReleaseARM/
tar -czvf dart-sdk.tar.gz dart-sdk
Updating glibc is required cause the version of glibc installed from the chromium build scripts is greater then the one shipped with Wheezy 7.2. The following commands update glibc.
shell
12345678
# Add an addtional source for the latest glibcsudo sed -i '1i deb http://ftp.us.debian.org/debian/ jessie main' /etc/apt/sources.list
# Update sources sudo apt-get update
# Download latest glibcsudo DEBIAN_FRONTEND=noninteractive apt-get -t jessie install -y libc6 libc6-dev libc6-dbg git screen
Copy over dart-sdk
From virtual box copy over the tarball to Beaglebone Black running debian.
shell
1
scp dart-sdk.tar.gz debian@192.168.2.2:~/
After the tarball is copied, uncompress and add to your PATH.
shell
1234
tar -zxvf dart-sdk.tar.gz
export PATH=~/dart-sdk:$PATHdart --version
Dart VM version: 1.0.0.7_r30634_adam (Fri Nov 29 01:14:42 2013) on "linux_arm"
Known issues at the moment
Pub does not work, issue could be followed at 15383. I was testing this out while staying at a hotel so some proxy settings might of been blocking or tripping up pub.
Feedback
If you have a better way of running dart on Beagleblone Black I would love to hear it! Please contact me on g+ and lets discuss.
Update on dartanalyzer
dartanalyzer will work after installing the default-jre on Beaglebone Black.
shell
1
sudo apt-get install default-jre
Addtional resources
dart_bleeding contains some scripts I typically use for this entire process.
ClientBase.responseParse(int statusCode, String responseBody) introduced and handles parsing responseBody. responseParse will throw DetailedApiRequestError if the body has an error.
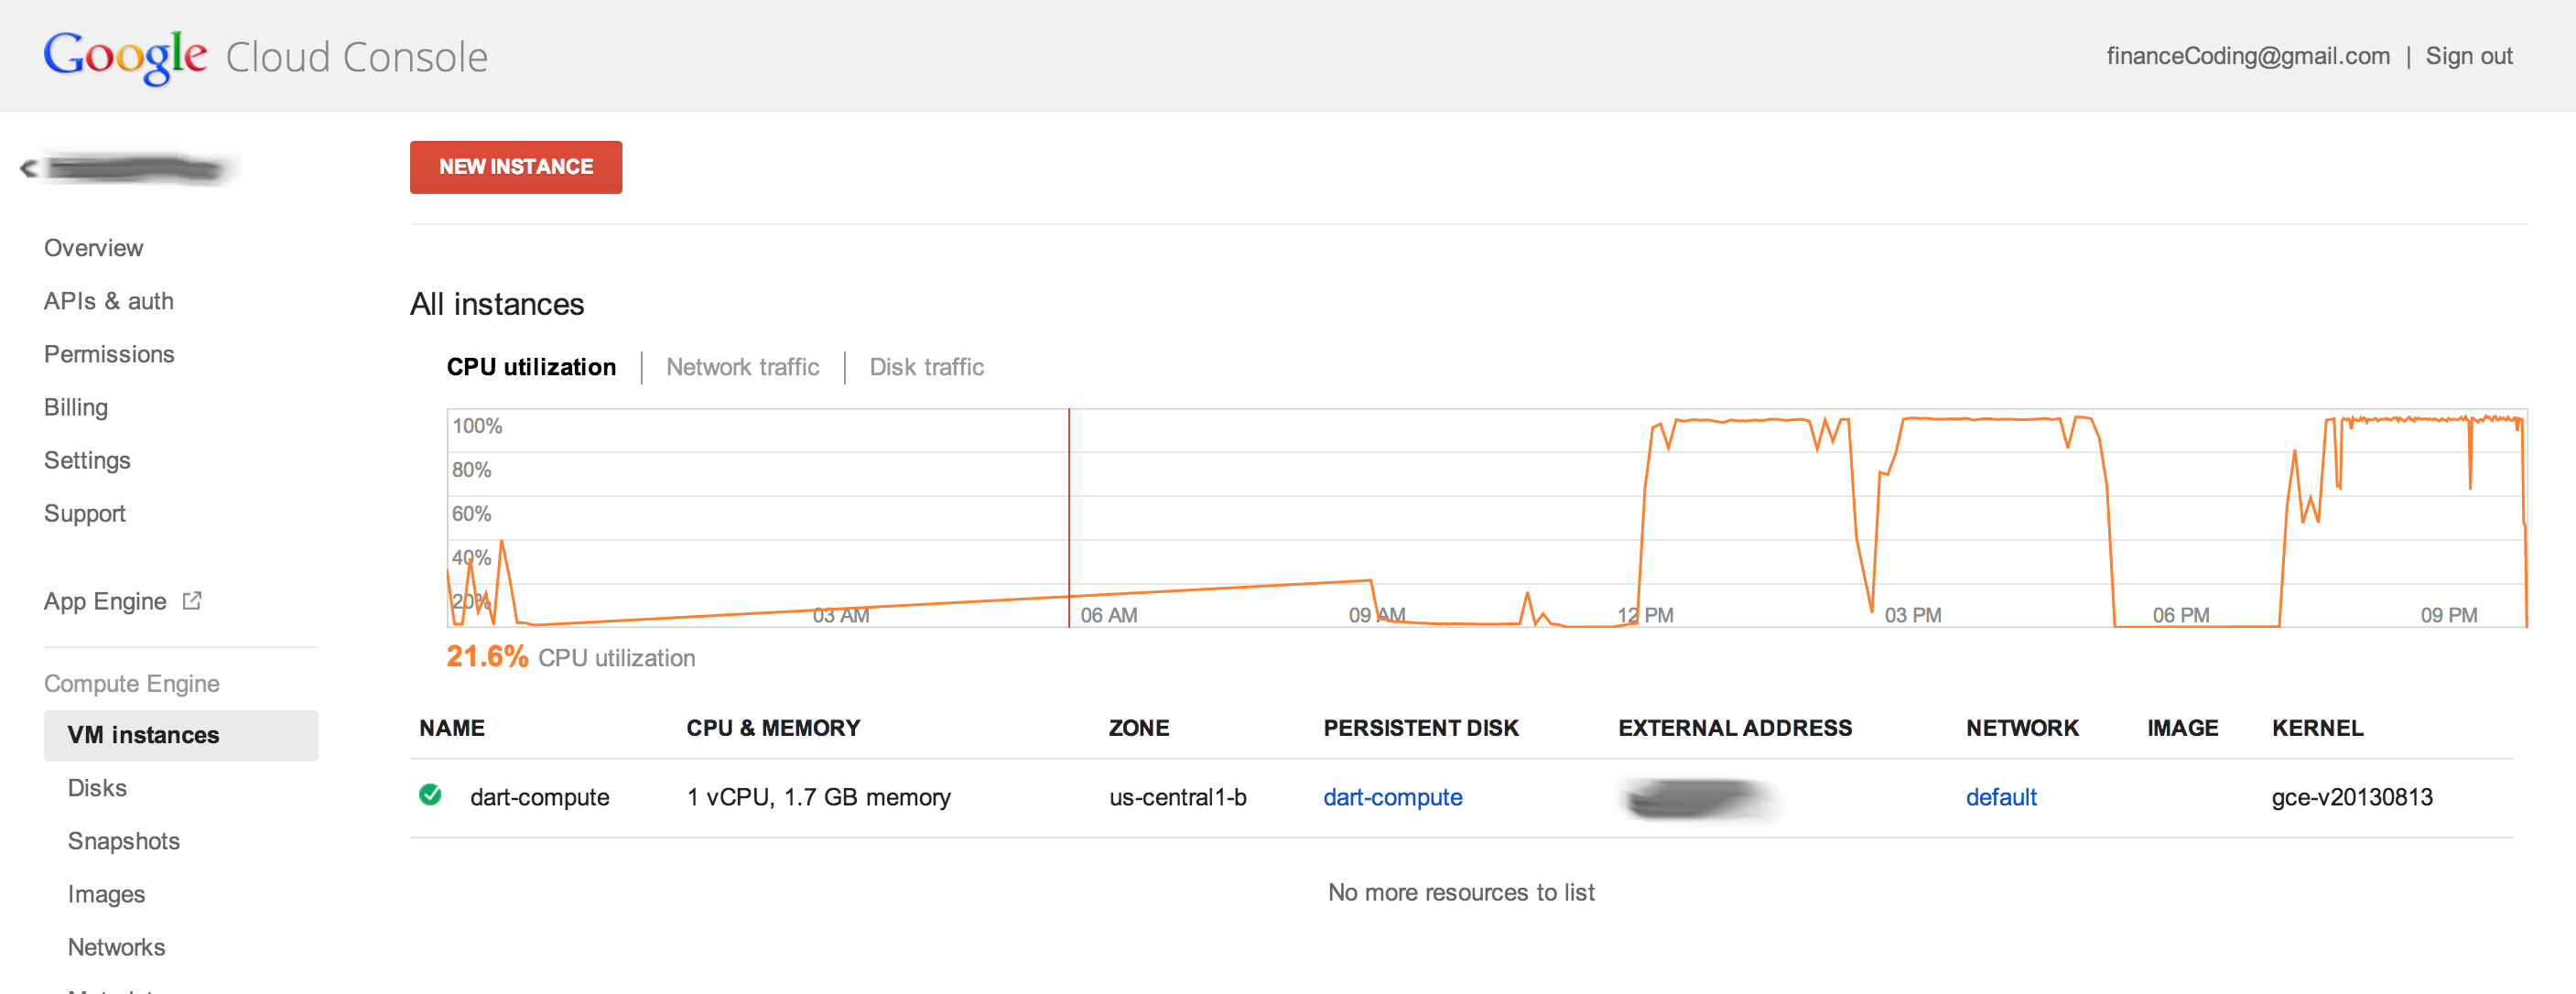
Quick how-to on using dart with Compute Engine. If not aware, right now is a great time to dive into Compute Engine cause google is giving away $2,000 worth of credits to individuals interested in trying it out. I’ve been using it for about 2-3 months now and totally love it.
What peeked my interest is it was flexable enough to run the dartvm as a server with minimal configuration. The one configuration hurdle was dependency of GLIBC >= 2.15 in the dartvm binaries. The good news is with a simple startup script the compute engine instance can be provisioned to support the latest linux dart-sdk.
The main tool we will use to provision a compute engine instance is gcutil. We could of used dartvm and google_compute_v1beta15_api but will save that for a later post.
After signing up for Compute Engine the next step should be to download and configure gcutil.
12345
$ wget https://google-compute-engine-tools.googlecode.com/files/gcutil-1.8.4.tar.gz
$ tar xzvpf gcutil-1.8.4.tar.gz -C $HOME$ export PATH=./gcutil-1.8.4:$PATH$ gcutil version
1.8.4
Next we want to create a startup.sh script that will be deployed to the compute engine instance. The script is a simple way to run additional commands to provision the instance. For dart we need to add a new deb source, update sources, install dependencies, fetch & unpack dart-sdk, and then execute our dart server. In the final line of the startup.sh script the command will create a dart server from the user account tied to this compute instance. Simply we clone a public git repo, install pub dependencies and screen a detached session that runs the dart server. This is not a very fancy way to deploy dart but a simple and quick way to get something running with no troubles. A real life deployment might include some trendy fab/chef/puppet combo.
startup.sh
123456789101112131415161718
#!/usr/bin/env bash# Add an addtional source for the latest glibcsudo sed -i '1i deb http://ftp.us.debian.org/debian/ jessie main' /etc/apt/sources.list
# Update sources sudo apt-get update
# Download latest glibcsudo DEBIAN_FRONTEND=noninteractive apt-get -t jessie install -y libc6 libc6-dev libc6-dbg git screen
# Download the latest dart sdkwget https://storage.googleapis.com/dart-editor-archive-integration/latest/dartsdk-linux-64.tar.gz -O /dartsdk-linux-64.tar.gz
# Unpack the dart sdktar -zxvf /dartsdk-linux-64.tar.gz -C /
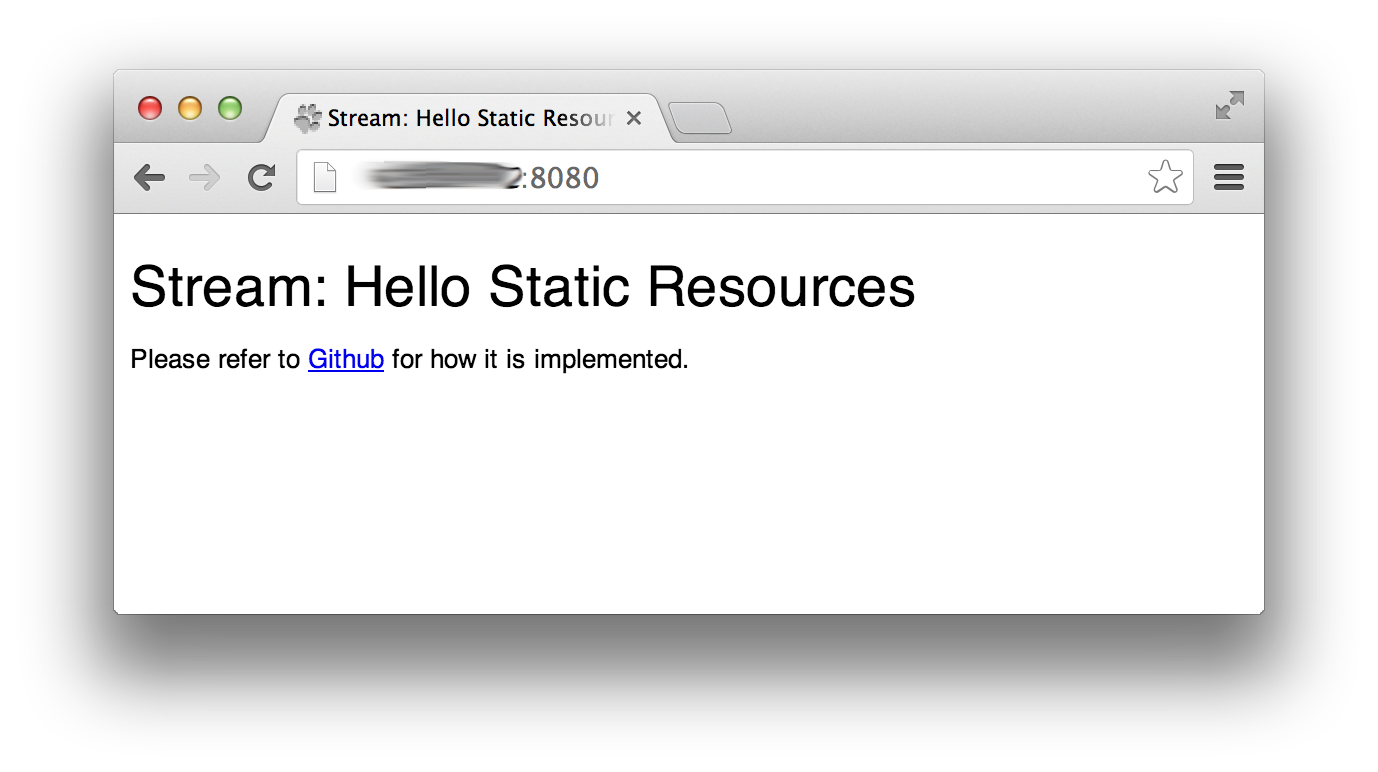
su - financeCoding -c 'ls -al && cd ~ && pwd && git clone https://github.com/rikulo/stream.git && /dart-sdk/bin/dart --version && cd stream && /dart-sdk/bin/dart --version && /dart-sdk/bin/pub install && cd example/hello-static && screen -d -m /dart-sdk/bin/dart webapp/main.dart'
After we have the startup.sh script we then create another deployment script. The following script will be the gcutil commands needed to actually create and provision the compute instance. The last part of our script includes a firewall rule for the port that the stream sample is running on. Without proper firewall rules no access from the outside is possible.
Tonights mash-up was taking the gplus-quickstart-dart and wiring it up for server side support. Similar to the gplus-quickstart-java, the client will use the gplus login button to do the OAuth2WebServer flow and send the code over to the server. The server can then verify and make calls on behalf of the client since an ‘offline’ token was requested. This demo just features the server side and what was used to put it together. Yulian Kuncheff has been the primary developer behind fukiya which is an express like framework for dart. The thing I liked most about fukiya was how simple and easy it was to setup URL handlers.
First off, setting up some dependencies.
123456
dependencies:
  google_plus_v1_api: any
  browser: any
  fukiya: '>=0.0.11'
  html5lib: ">=0.4.1 <0.4.2"
  logging: ">=0.4.3+5"
A quick outline of what URLs fukiya handles. Dead simple to setup!
The index handler is special cause we needed to inject a state token into the page and HTTP session. The state token is then verified on the /connect post. The one-time token helps avoid any Confused_deputy_problems.
12345678910111213141516171819202122
voidgetIndexHandler(FukiyaContextcontext){// Create a state token. context.request.session["state_token"]=_createStateToken();// Readin the index file and add state token into the meta element. varfile=newFile(INDEX_HTML);file.exists().then((boolexists){if(exists){file.readAsString().then((StringindexDocument){Documentdoc=newDocument.html(indexDocument);ElementmetaState=newElement.html('<meta name="state_token" content="${context.request.session["state_token"]}">');doc.head.children.add(metaState);context.response.writeBytes(doc.outerHtml.codeUnits);context.response.done.catchError((e)=>serverLogger.fine("File Response error: ${e}"));context.response.close();},onError:(error)=>serverLogger.fine("error = $error"));}else{context.response.statusCode=404;context.response.close();}});}
On the /connect post we will expect a gplus id to be passed to the query parameters and some token data posted. We can then verify the state token and use the token data for accessing the Google APIs.
voidpostConnectDataHandler(FukiyaContextcontext){serverLogger.fine("postConnectDataHandler");StringtokenData=context.request.session.containsKey("access_token")?context.request.session["access_token"]:null;// TODO: handle missing tokenStringstateToken=context.request.session.containsKey("state_token")?context.request.session["state_token"]:null;StringqueryStateToken=context.request.queryParameters.containsKey("state_token")?context.request.queryParameters["state_token"]:null;// Check if the token already exists for this session. if(tokenData!=null){context.send("Current user is already connected.");return;}// Check if any of the needed token values are null or mismatched.if(stateToken==null||queryStateToken==null||stateToken!=queryStateToken){context.response.statusCode=401;context.send("Invalid state parameter.");return;}// Normally the state would be a one-time use token, however in our// simple case, we want a user to be able to connect and disconnect// without reloading the page. Thus, for demonstration, we don't// implement this best practice.context.request.session.remove("state_token");StringgPlusId=context.request.queryParameters["gplus_id"];StringBuffersb=newStringBuffer();// Read data from request.context.request.transform(newStringDecoder()).listen((data)=>sb.write(data),onDone:(){serverLogger.fine("context.request.listen.onDone = ${sb.toString()}");MaprequestData=JSON.parse(sb.toString());Mapfields={"grant_type":"authorization_code","code":requestData["code"],// http://www.riskcompletefailure.com/2013/03/postmessage-oauth-20.html"redirect_uri":"postmessage","client_id":CLIENT_ID,"client_secret":CLIENT_SECRET};http.Client_httpClient=newhttp.Client();_httpClient.post(TOKEN_ENDPOINT,fields:fields).then((http.Responseresponse){// At this point we have the token and refresh token.varcredentials=JSON.parse(response.body);_httpClient.close();varverifyTokenUrl='${TOKENINFO_URL}?access_token=${credentials["access_token"]}';newhttp.Client()..get(verifyTokenUrl).then((http.Responseresponse){serverLogger.fine("response = ${response.body}");varverifyResponse=JSON.parse(response.body);StringuserId=verifyResponse.containsKey("user_id")?verifyResponse["user_id"]:null;StringaccessToken=credentials.containsKey("access_token")?credentials["access_token"]:null;if(userId!=null&&userId==gPlusId&&accessToken!=null){context.request.session["access_token"]=accessToken;context.send("POST OK");}else{context.response.statusCode=401;context.send("POST FAILED ${userId} != ${gPlusId}");}});});});}
Now the HTTP session has the full ability to make calls on behalf of the user. The /people method will be called from the client to retrieve the list of visible friends of that user.
The final responsibility we can bestow upon the server is allowing the client to disconnect by revoking OAuth access.
1234567891011121314151617181920
voidpostDisconnectHandler(FukiyaContextcontext){StringtokenData=context.request.session.containsKey("access_token")?context.request.session["access_token"]:null;if(tokenData==null){context.response.statusCode=401;context.send("Current user not connected.");return;}finalStringrevokeTokenUrl="${TOKEN_REVOKE_ENDPOINT}?token=${tokenData}";context.request.session.remove("access_token");newhttp.Client()..get(revokeTokenUrl).then((http.Responseresponse){context.request.session["state_token"]=_createStateToken();Mapdata={"state_token":context.request.session["state_token"],"message":"Successfully disconnected."};context.send(JSON.stringify(data));});}
Thats about it, Happy Dart Hacking! Special thanks to Gerwin Sturm for putting together the original example for client side. Full source code can be found at gplus-quickstart-dart in the server folder. Please replace your own keys cause mine will be removed at some point.
Google has made the realtime api available for developers. Realtime api provides operational transformation on strings, lists, maps and custom objects. The application data gets stored on Google Drive and is available from any supported browser. This is going to be the tooling of the future for collaborative applications.
I took some time to see what it would take for implementing a sample realtime application in dart. Also wanted to make sure my sample could run on mobile chrome.
Since realtime api is new, dart bindings don’t really exist. Lucky for us we have js-interop library. The js-interop library provides communications to existing javascript code from dart. I consider this mostly a quick hack to get started with the realtime api until a more native interface exists.
The sample realtime_touch_canvas demonstrates a multi touch canvas surface that updates in realtime with all clients that have the application open.
Most of the heavy lifting is done by rtclient.dart. I ported the code from the javascript version. Its enough code to get started right away but a more structured solution should be done. The main class is RealTimeLoader used for realtime loading.
12345
rtl=newRealTimeLoader(clientId:'CLIENTID.apps.googleusercontent.com',apiKey:'KEY');rtl.start().then((boolisComplete){/* RealTimeLoader has authenticated the application and is ready to load a file */loadRealTimeFile(fileId,model.onFileLoaded,model.initializeModel);});
model.onFileLoaded and model.initializeModel handle the creating of model data and loading of model data.
In the realtime_touch_canvas, model data was a simple list of json strings. The ticky part here is you need to remember that your working with the realtime api within the javascript vm. So an array needs to be allocated from js-interop.
After the model is created we then get called to load the file. Loading the file for our purposes is binding the collaborative objects. Some tricky things to note here is we are retaining the javascript objects so we can access them after exit of the callback. Also the callbacks have to be wrapped within js-interopjs.Callback.many proxy object. The callbacks _linesOnAddValuesChangedEvent and _linesOnRemovedValuesChangedEvent are fired off when the collaborative list object has items added or removed.
When the callback is called the data would be in the javascript virtual machine so we can parse it and store in our native dart code. This is more of a convenience then a must do, that way we can expose plan old dart objects to our other parts of the dart application.
Now when we want to store a line in the application we simply convert it to json and push it into the collaborative list. The little tick here is to make sure we are scoped when accessing the _lines object since it lives in the javascript virtual machine.
Tonights hacking was with stream and heroku. Stream is a Dart web server supporting request routing, filtering, template technology, file-based static resources and MVC design pattern. I just planned on serving static content from heroku using full dart based web server.
Creating a new project called stream-todomvc. Going to use the todomvc from the web-ui project as our content for the stream server. First thing that should be done is adding the dependencies to the pubspec.yaml file.
stream intro documentation goes over some basic configurations and settings. I’m just going to use them for now to get something running right away. The key to note when serving code from the web/ folder in dart projects is having the stream server code in web/webapp/. That way stream can find all your resources with little configuration. With very little dart code we can have static web server going.
Next we build all the static data for our webapp to function. This will include calling build.dart and dart2js. The second step of calling dart2js helps with clients that do not have the dartvm built in.
shell
12345678910111213
adam@Adams-MacBook-Air:~/dart/stream_todomvc
$ pub install
Resolving dependencies...
Dependencies installed!

adam@Adams-MacBook-Air:~/dart/stream_todomvc
$ dart build.dart
Total time spent on web/index.html                           -- 839 ms
Total time                                                   -- 863 ms

adam@Adams-MacBook-Air:~/dart/stream_todomvc
$ dart2js -oweb/out/index.html_bootstrap.dart.js web/out/index.html_bootstrap.dart
Using snapshot /Users/adam/Documents/DartEditor/dart/dart-sdk/lib/_internal/compiler/implementation/dart2js.dart.snapshot
adam@Adams-MacBook-Air:~/dart/stream_todomvc
$ git add -a -m "ready for deploy"adam@Adams-MacBook-Air:~/dart/stream_todomvc
$ git push -v --set-upstream heroku master:master
Pushing to git@heroku.com:stream-todomvc.git
Counting objects: 5, done.
Delta compression using up to 4 threads.
Compressing objects: 100% (3/3), done.
Writing objects: 100% (3/3), 283 bytes, done.
Total 3 (delta 2), reused 0 (delta 0)-----> Fetching custom git buildpack... done-----> Dart app detected
-----> Installing Dart VM, build: latest
-----> Copy Dart binaries to app root
-----> Install packages
*** Found pubspec.yaml in .
Resolving dependencies...
Dependencies installed!
Fixed web symlink
-----> Discovering process types
Procfile declares types -> web
-----> Compiled slug size: 8.9MB
-----> Launching... done, v7
http://stream-todomvc.herokuapp.com deployed to Heroku
To git@heroku.com:stream-todomvc.git
042f1f4..b35984b master -> master
updating local tracking ref 'refs/remotes/heroku/master'
Deploying to heroku in this style is just a good starting point. web-ui and dart in general is still working on a deployment story. The URL for the stream-todomvc will contain out in its location, not very desirable. In the future a buildtool will aid the deployment story for dart.
We plan to keep the client libraries up to date with uploader.dart script. Still somewhat a manual process, future automation could happen when/if we have the ability to get notified about google api changes. For now we will push updates when appropriate. This will ensure that we can push the latest versions of the apis to pub and still have previous revisions available. Some of the more intricate parts of this script include auto version incrementing pubspec files and syncing to github, then pushing to pub.
Would you want to contribute to this project? Please feel free to ping us Adam Singer/Gerwin Sturm on g+, we’re definitely looking to refactor some parts and test others. Our main focus for this release was to get something out the door that is pleasantly usable.
Many hours of testing and development was done to have a simple and easy way to use the google client apis in dart! We hope you enjoy and look forward to seeing what you build.
To get started with client api examples check out dart_api_client_examples. The github hosted source code can be found at dart-google-apis
drone.io has really proven to be useful for dart projects. One common pattern I find my self doing with projects these days is running the dart_analyzer before running unit tests. Had a discussion with Kevin Moore about having a dart_analyzer task included in hop, part of the bot.dart framework. We both agreed it would be nice to automate that task and not have shell scripts running the show. Thus createDartAnalyzerTask was born. createDartAnalyzerTask allows you to add dart scripts that are libraries or main entry points to be analyzed by dart_analyzer, this allows for a first step of safety, so that code you have passes the static checker. It does not mean your code is perfect but can help you find warnings and errors. A great combination for this is pairing it up with drone.io, that way when a new sdk comes out drone can let you know automatically if it passes static checker.
libraryhop_runner;import'dart:async';import'dart:io';import'package:bot/bot.dart';import'package:bot/hop.dart';import'package:bot/hop_tasks.dart';voidmain(){//// Analyzer//addTask('analyze_lib',createDartAnalyzerTask(['lib/stats.dart']));//// Hop away!//runHopCore();}
Add a bin/hop script to your project, bin/hop script is not required but does help manage some flags you might be interested in having.
Now we have a warning, but since dart is a dynamic langauge we should not treat that as an error (at some point we might provide the option of making warnings fail drone.io).
If we introduce a real error, the task runner should yell at us.
The exit code will let drone.io know that we did not exit cleanly. I love drone.io for this reason, it’s simple to get setup right away with little fuss.
A complete run on drone.io might look something as follows