tl;dr A common question that comes up is connecting all parts of dart together. Here I will show a simple example of connecting up web-ui and objectory.
web-ui is a WebComponents framework provided by the dart-lang team. objectory is a data persistence layer for MongoDB that provides typed, checked environment for models, saving and queries. With these two components and a very simple web server we could have a nice full stack solution in dart.
Initially Vadim Tsushko did some work to wire up TodoMVC from the web-ui examples with indexdb. Using the same code and updated version of TodoMVC I was able to connect it to mongodb using the web socket connection provided with objectory.
It would of been nice if this solution could possibly be deployed onto heroku, ended up not possible since heroku does not support native web socket connections with their internal routing. socket.io does work on heroku but uses long polling instead of true web sockets.
Another note, since dart is in a transitional phase right now for implementing streams, some of this code depends packages that have not yet been pushed to pub.dartlang.org
So lets get started with the basics, getting up and running with objectory. Install mongo if its not already and fire up a mongo database.
mongo install
1234
brew install mongo
cd /tmp/
mkdir db
mongod -dbpath .
The version of dart being used is the latest trunk build 17072
12
$ cat ~/dart/dart-sdk/version
0.3.0.1_r17072
clone and test objectory as a sanity check
objectory
1234567
$ cd /Users/adam/dart/
$ git clone https://github.com/vadimtsushko/objectory.git
$ cd objectory
$ pub install
$ cd bin
$ dart objectory_server.dart
listing on http://127.0.0.1:8080
Open up another terminal and run the example/blog_console.dart application.
1234567891011121314151617181920212223
$ cd ~/dart/objectory/example
$ dart blog_console.dart
===================================================================================>> Adding Authors===================================================================================>> Authors ordered by age ascending
[Jorge Luis Borges]:[jorge@borges.com]:[123][William Shakespeare]:[william@shakespeare.com]:[587]===================================================================================>> Adding Users===================================================================================>> >> Users ordered by login ascending
[jdoe]:[John Doe]:[john@doe.com][lsmith]:[Lucy Smith]:[lucy@smith.com]===================================================================================>> Adding articles===================================================================================>> Printing articles
Jorge Luis Borges:Caminando por Buenos Aires:Las callecitas de Buenos Aires tienen ese no se que...
2013-01-07 16:21:26.437:Lucy Smith: Well, you may do better...
2013-01-15 16:01:26.445:John Doe: I love this article!
William Shakespeare:I must have seen thy face before:Thine eyes call me in a new way
2013-01-16 11:28:06.453:John Doe: great article!
Now if we want to see the blog stored in mongo we need to remove the line in blog_console.dart that drops the database collection and rerun.
Opening up mongo and peeking in side we see the following entries have been stored.
1234567891011121314151617
$ mongo
MongoDB shell version: 2.2.2
connecting to: test> show dbs
local(empty)objectory_blog 0.203125GB
> use objectory_blog
switched to db objectory_blog
> show collections
Article
Author
User
system.indexes
> db.Article.find(){"_id" : ObjectId("50f751f09925f54002000008"), "title" : "Caminando por Buenos Aires", "body" : "Las callecitas de Buenos Aires tienen ese no se que...", "author" : DBPointer("Author", ObjectId("50f751f09925f54002000001")), "comments" : [{"date" : ISODate("2013-01-08T00:24:21.201Z"), "body" : "Well, you may do better...", "user" : DBPointer("User", ObjectId("50f751f09925f54002000005"))}, {"date" : ISODate("2013-01-16T00:04:21.206Z"), "body" : "I love this article!", "user" : DBPointer("User", ObjectId("50f751f09925f54002000004"))}]}{"_id" : ObjectId("50f751f09925f54002000009"), "title" : "I must have seen thy face before", "body" : "Thine eyes call me in a new way", "author" : DBPointer("Author", ObjectId("50f751f09925f54002000000")), "comments" : [{"date" : ISODate("2013-01-16T19:31:01.212Z"), "body" : "great article!", "user" : DBPointer("User", ObjectId("50f751f09925f54002000004"))}]}>
Now that we have done a sanity check we can start to move forward with TodoMVC side of things.
I’ve provided a web-ui branch, the branch fixes up some of the pubspec inconsistencies between the projects on pub.dartlang.org. In the future this would not be needed.
objectory provides a very nice browser based web socket connector to the objectory server named ObjectoryWebsocketBrowserImpl. This allows us to register our models. The TodoMVC application model has a Todo object we’d like to persist.
By extending PersistentObject and adding the getProperty and setProperty methods to our getters and setters we have easily transformed this object to be persisted by objectory.
To bind this up to objectory we new up a ObjectoryWebsocketBrowserImpl, when the application model is created, register the Todo class.
model.dart
1234567891011121314151617
import'package:objectory/objectory_browser.dart';ObjectoryQueryBuilderget$Todo=>newObjectoryQueryBuilder('Todo');constDefaultUri='127.0.0.1:8080';AppModel_app;AppModelgetapp{if(_app==null){_app=newAppModel();objectory=newObjectoryWebsocketBrowserImpl(DefaultUri,()=>objectory.registerClass('Todo',()=>newTodo('')),false);// set to true to drop modelsobjectory.initDomainModel().then((_){objectory.find($Todo).then((todos){app.resetTodos(todos);});});}return_app;}
The final step is when a todo is added we also save it in objectory by calling objectory.save().
main.dart
1234567891011
import'package:objectory/objectory.dart';[...]voidaddTodo(Evente){e.preventDefault();// don't submit the formvarinput=query('#new-todo');if(input.value=='')return;vartodo=newTodo(input.value);app.todos.add(todo);objectory.save(todo);input.value='';}
In the custom branch provided, I renamed the standard build.dart to x_build.dart in hope to save my poor laptop from needlessly building. On a faster system this is not needed. Now we can launch the x_build.dart to generate the output build from the web components sample.
12
$ dart x_build.dart
Total time spent on example/todomvc/main.html                -- 276 ms
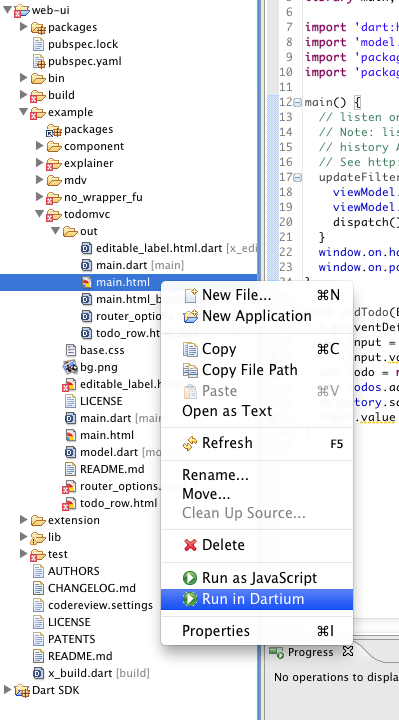
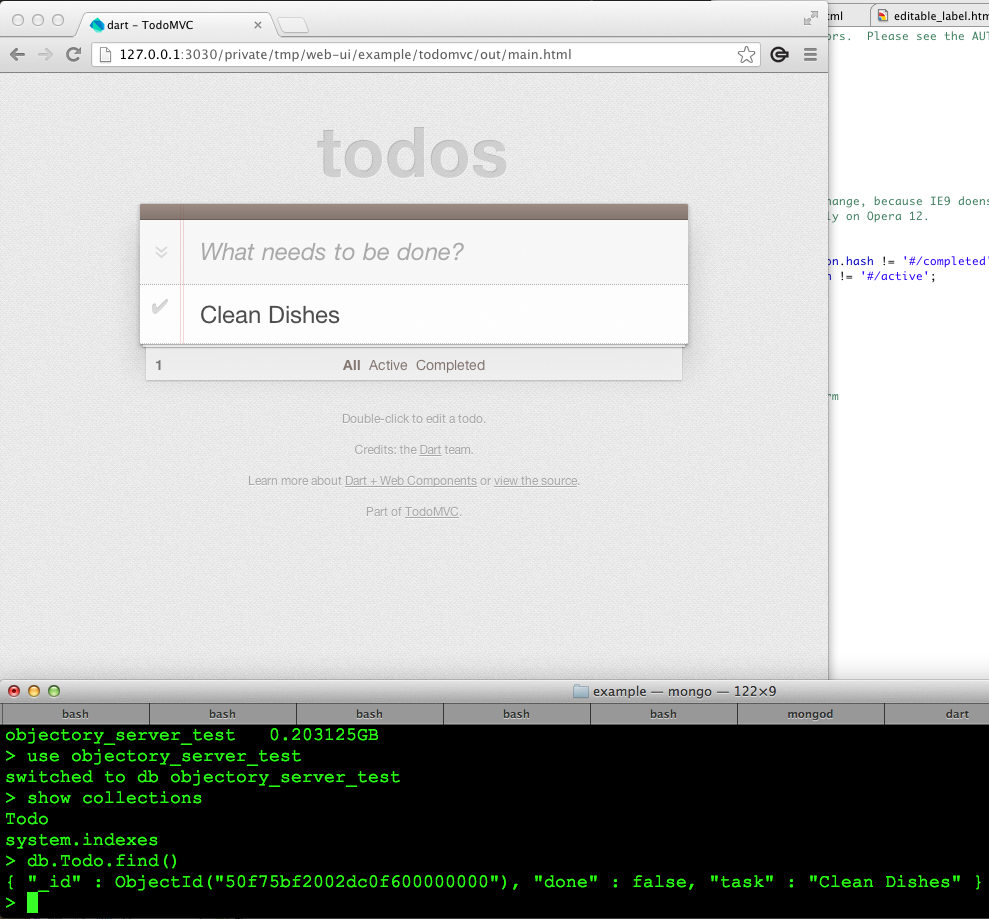
From the dart editor we can now launch the output folder main.html.
This is a nice start, we can launch a web-ui application from dartium and connect up mongo. The issues now… how do we get the kind of application live and not launched on localhost?
Create a http server
Add objectory to it
Compile todomvc application to javascript
Why are the steps above needed? First the objectory ObjectoryServerImpl used in objectory_server.dart hides HttpServer which doesn’t really work for us if we need to serve up static content. Good thing that the class is relativity simple to modify. Compiling todomvc to javascript is an additional step also, but helps us greatly the server logic, only a few files will need to be matched. When a complete and updated web server framework comes to town for dart this would also not be needed.
Modifying the DefaultUri for ObjectoryWebsocketBrowserImpl so it looks at the host’s location will help for deploying it on a server. The web socket location can then be resolved dynamically.
$ cd ~/dart/
$ git clone https://github.com/financeCoding/dart-full-stack-example.git
Moving onto dart_full_stack_example, this project will contain the compiled js and html code along with a server. The server will handle delivering the static content also provide the interfaces for the web socket connection.
Looking at the server.dart source code will give you a fuller example, all that is needed now is to run dart server.dart and you’ll have server running.
This is a more complicated process then it has to be, at some point it will get easier when a true deployment and configuration story happen.